Welcome to My Page!

Welcome! I am starting this page to share the recipes I cook in my kitchen that I already use and ones that I have found on the web and tried. I love looking at other people's cooking blogs for ideas to use in my own kitchen. My favorite blogs are the ones with step-by-step pictures and directions like Southern Plate, created and run by Christy Jordan. Her humor, stories, and recipes are great! I find that when I talk to people about cooking, many are intimidated by recipes. I always hear others say that they want cookbooks and recipes with pictures. My goal for this page is to share easy and delicious recipes that anyone can make. Believe me, I am no chef. So, I figure if I can prepare and cook these recipes, then you can too!


Tuesday, August 30, 2011

Made from Scratch Chocolate Cupcakes

I am not normally a big chocolate fan. There are times when I want a little taste of chocolate but it's just not my thing (I know, it's not normal). These cupcakes, however, are AMAZING!!! I made these for a bridal shower, and they were a hit. They are moist and have a rich chocolate flavor. They are super easy to make, which also makes them great.
You will need the following ingredients: all purpose flour, sugar, milk, cooking oil (I used Canola oil), two eggs, baking powder, baking soda, unsweetened cocoa powder, vanilla extract, salt, and boiling water. The recipe recommends using the best quality cocoa powder and vanilla extract; however, I am a big fan of buying store brand items or whatever is on sale the most!
 Line your cupcake tins with the liners of your choice. Preheat your oven to 350º.
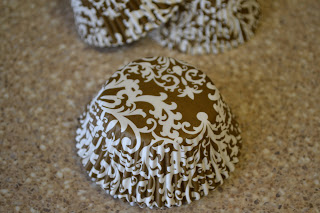
 Don't you just love these? I used these liners that I found at Michael's craft store. They fit perfectly with the brown and turquoise color theme that we used for the bridal shower.
 In a large mixing bowl, add 2 cups of sugar, 1 3/4cups all purpose flour, 3/4 cup unsweetened cocoa powder, 1 1/2 teaspoons baking powder, 1 1/2 teaspoons baking soda, and 1 teaspoon of salt.
 Stir all of the dry ingredients together.
 Next, add 2 eggs, 1 cup of whole milk, 1/2 cup of canola oil, and 2 teaspoons of vanilla extract.
Beat on medium speed for 1 minute. While working on this, start boiling some water.
Stir in 1 cup of boiling water.
The batter will be thin, but that's okay.
 Pour your batter into a container with a lip. This will make it easier to fill you cupcake liners. You want to fill each liner about 2/3 full (maybe just a little less). You will need to leave enough room for the cupcakes to rise as they cook, but not go over the edge of the liner. This is to make sure all of the cupcakes are uniform and that you have a nice, even surface for decorating.
Place your cupcake pans in the oven and bake for 22-24 minutes. When you are cooking cupcakes, you want to check them at the shortest cooking time recommended. So, I would check them at 22 minutes. You don't want to over cook them.
 Allow your cupcakes to completely cool down on cooling racks before decorating them.

Made from Scratch Chocolate Cupcakes
Cooking Time: 22-24 minutes
Preheat Oven to 350º

Ingredients:
- 2 cups sugar
-1 3/4 cups all purpose flour
- 3/4 cup unsweetened cocoa powder
- 1 1/2 tsp. baking powder
-1 1/2 tsp. baking soda
- 1 tsp. salt
- 2 eggs
- 1 cup whole milk
- 1/2 cup canola oil
- 2 tsp. vanilla extract
- 1 cup boiling water


Line muffin tins with cupcake liners of your choice. In a large mixing bowl, combine sugar, all purpose flour, cocoa, baking powder, baking soda, and salt. Stir together and mix well. Add eggs, milk, oil, and vanilla extract. Beat on medium speed for 1 minute with an electric mixer. Stir in boiling water. Fill the cupcake liners 2/3 full with batter. Bake for approximately 22-24 minutes. Cool completely before decorating.


I wanted to share all of these cute liners that I bought at Michael's. I have started a collection of cute liners that I have found at Michael's, A.C. Moore, and Target. I will add a newer picture of my collection soon. I already have a few more since taking this picture. So cute!
I also found these really cute Paula Deen recipe cards at Michael's for cheap ($1 per pack). Love them!!

Saturday, August 20, 2011

Asian Style Green Beans

This recipe is hard for me to actually call a recipe. My husband and I sort of made it up. I love the spicy green beans at Chinese restaurants, and I was getting tired of preparing green beans the same ol' way all the time. We created these and eat them all the time. We don't really measure anything when we make them, so I had to pay attention when making this post. The measurements don't have to be exact. This recipe will be a good starting point for you to make your beans. You can increase or decrease any of the ingredients to make it more or less spicy. Let me know if you add anything different to these. I would love to hear your ideas.
You will need the following ingredients: a package of frozen whole green beans, olive oil, garlic powder, soy sauce, lime juice, Sriracha hot sauce, sesame oil, and salt & pepper.
To begin, cook the green beans in the microwave according to the directions on the package. While they are cooking, heat up a little olive oil in your pan over medium heat. Don't use too much or else your beans will be greasy.
Make your sauce for the green beans by mixing the following: 3 Tbsp. soy sauce (I use low sodium), 3 dashes of sesame oil, 1 tsp. lime juice, 1 tsp. Sriracha hot sauce, a dash of garlic powder, and salt & pepper to taste.
Dump your cooked green beans into your pan of hot oil.
Pour the sauce that you mixed over the beans.
Toss the beans in the sauce for about 3 minutes. They just need to be in the pan long enough to get the flavor of the sauce and to warm up.
Serve as a side dish with dinner!

Asian Style Green Beans
Ingredients:
-12 oz. package of frozen whole green beans
-olive oil
-garlic powder
-soy sauce
-lime juice
-Sriracha hot sauce (you can usually find it near the Asian foods section)
-sesame oil
-salt & pepper

Cook the green beans in the microwave according to the directions on the package. Heat up a large pan with a little bit of olive oil over medium heat. While the oil is heating up and the green beans are cooking in the microwave, mix up the following ingredients to make your sauce: soy sauce, sesame oil, lime juice, Sriracha hot sauce, garlic powder, and salt & pepper. Add the cooked green beans to your pan of hot oil. Pour the sauce over the beans. Toss the beans in the sauce for about 3 minutes.

Friday, August 12, 2011

Custom Water Bottles for Parties

 This post has nothing to do with cooking, but I really wanted to share it! These water bottles are a simple way to bring color into your parties and gatherings. The best part is that they are simple and inexpensive to make. 
Start by deciding what colors you want to use as a theme at your party. For this post, I am using  turquoise and brown. These bottles will be used for a bridal shower this weekend. These are the materials you will need for this project:
 You will need bottled water, clear packing tape- 2" wide, scrapbooking paper, and a paper cutter
 
Start by removing the labels from your water bottles.

 Cut your paper into strips that are 1 3/4" by 8 1/2" 
Place a piece of tape over the strip so that there is a border of the sticky part of the tape all around. This is what will attach the paper to the bottle.
Turn the strip over and press on the back side of the paper so that it evenly sticks to the tape.


Take your strip and start wrapping it around a bottle. Make sure that it goes on even. You don't want a crooked label. As you wrap the bottle, press down on the edges of the tape so that they are secure.


Voila! You have a custom water bottle that will bring a splash of color to your party!


** These are not completely water-proof. I don't recommend putting them into ice to chill them. I am planning on keeping them in the refrigerator and then putting them out right before it is time to serve them. You could also serve them with cups of ice.

Thursday, August 11, 2011

Tina's Chicken Casserole

This first post is a favorite dish in my house. This recipe was given to me by my sister when I was still in college at Appalachian State (Go Mountaineers!) and she was at UNC-Wilmington. We both were pretty broke back in those days but wanted to be able to cook good meals while we were away from home. Her roommate, Tina, had made this dish for her. It was such a hit that she passed it on to me. It looks and sounds so simple, but it is so good!

To start, you will need the following ingredients: white rice, 2 cans of Cream of Chicken Soup, mayo, chicken (you can use 2-3 cooked chicken breasts, but I always use 2 cans of chicken- it's just easier), lemon juice, butter, and corn flakes

If you don't have one of these, I highly recommend getting one. This is the Rice Cooker Plus from Pampered Chef. It makes cooking rice so simple. No more burning rice to the bottom of your pots!
Start by cooking your rice.
While your rice is cooking, start mixing your ingredients in a large bowl. Add the two cans of Cream of Chicken.
Add 3/4 cup of mayo. I just squeeze it in and estimate 3/4 cup.
 Add your chicken (either 2 cans of chicken or 2-3 cooked chicken breasts).
 Squirt about 1 Tablespoon of lemon juice in.
 Once your rice is cooked, add that also. You will need 2 cups of cooked white rice.
Now give it a stir and mix it all up.
 Spread your mixture into a 9x13 baking dish.
 Melt 1/4 cup of butter (that's half a stick). This will go on top of everything before you put it in the oven.
 While your butter is melting, sprinkle corn flakes on top of your mixture that you spread in the baking dish.
Spoon the melted butter over the corn flakes evenly. I find that using a spoon instead of pouring the butter helps me keep it even.
Now bake your casserole at 350° for 45 minutes.
Your corn flakes will be a golden brown when your casserole is done. Be careful not to burn them! My husband said to me, "I'm glad you are making your blog because you didn't burn the corn flakes this time." Haha!
Enjoy!


Tina's Chicken Casserole
Cooking time: 45 min
Preheat oven to 350°
 
Ingredients:
- 2 cans of Cream of Chicken Soup
-  3/4 cup of mayo
- 1 Tbsp. lemon juice
- 2 cans of chicken (or 2-3 cooked chicken breasts)
- 2 cups of cooked white rice
- 1 cup corn flakes cereal
- 1/4 cup butter, melted

Combine the soup, mayo, lemon juice, chicken, and rice. Spread mixture into a 9x13 baking dish. Top with corn flakes and melted butter. Bake at 350° for 45 minutes.

Variations: 
  • Add 1 cup of chopped celery to your mixture before cooking. I love it with the crunch of celery! I would have cooked it with the celery but then my husband wouldn't have eaten it. He's pretty picky.
  • Add water chestnuts to your mixture.